I decided to try the transparent plastic in Piggy's shoes. As usual, first I needed the insoles.
I glued fabric on them.
And turned the edges under the soles.
I'm usually not particular about the placement of patterns in insoles, but this time I made sure the they would be identical.
Then I cut wide straps from plastic, added strips of stickers, and applied glossy sealer to stop the stickers from falling off.
I made holes at the end of the straps as before and used double-sided tape to keep the straps in place before gluing.
I used one pair of the polymer clay heels just made. I applied one coat of glossy sealer, let it dry, added stickers, and then applied more sealer. The purpose of the first coat of sealer was to make the surface less porous and help the stickers stay in place.
I actually applied the last coat of sealer after assembling the shoes and hung the shoes to dry. The result is always neater, if you can apply the sealer to all necessary surfaces (sides, back, front, bottom) at once, but that means you need to figure out a way to place the heels/shoes to dry in a way that the wet surfaces won't touch anything.
Here are the shoes on 16" Miss Piggy.
For the previous post on using transparent plastic, see here.
Friday, September 7, 2012
Wednesday, September 5, 2012
Making modeling clay heels
My main problem with modeling clay is that I cannot make two identical pieces without a pattern or mold. So, I have solved the problem of making heels by using a cardboard mold.
This time I was making heels for 16" Miss Piggy's shoes. The photo below shows the cardboard insole with an empty mold for the heel.
The hardest part is making the pattern for the mold. You can see the basic form below, but it is very much trial and error. Once you've got the pattern right, draw the required number of them on cardboard, fold the front parts as shown, and cut out the pieces. You can make the folds after cutting, but I find this order easier.
Curve the back and sides of the heels using a suitable round object, for example, a marker pen.Then glue the front as shown. The result is the neatest, if the lower flap (the one that goes inside, against the modeling clay) covers the entire width of the heel front. If it doesn't, you'll get a visible seam in the modeling clay (see the last photo of this blog post).
When the glue is dry, pack the molds full of modeling clay. Press it tightly to avoid any gaps, but be careful, so you won't crush the mold. When the mold is full, use a craft knife to cut off any modeling clay that exceeds the top or bottom of the mold, and make sure the form of the heel is the way you want it.
Bake the heels in the oven according to the instructions given in the packaging of the modeling clay you're using. After getting them out of the oven, remove the cardboard immediately (as soon as you can handle the hot pieces). If you let the pieces cool down, the cardboard will be a lot harder to remove. If you're going to cover the heels with fabric, leather, etc., you can also leave the cardboard in place (especially, if you have used leftover pieces of clay of various colors and want to make sure that won't show through the material used for covering the heels).
Here are the finished heels for Miss Piggy.
The top of the heel may be convex even when you have cut it before baking. If that is the case, just use a craft knife to remove any extra material. This has the added benefit that glue will hold better, if the surface is cut or sanded after baking.
This time I was making heels for 16" Miss Piggy's shoes. The photo below shows the cardboard insole with an empty mold for the heel.
The hardest part is making the pattern for the mold. You can see the basic form below, but it is very much trial and error. Once you've got the pattern right, draw the required number of them on cardboard, fold the front parts as shown, and cut out the pieces. You can make the folds after cutting, but I find this order easier.
Curve the back and sides of the heels using a suitable round object, for example, a marker pen.Then glue the front as shown. The result is the neatest, if the lower flap (the one that goes inside, against the modeling clay) covers the entire width of the heel front. If it doesn't, you'll get a visible seam in the modeling clay (see the last photo of this blog post).
When the glue is dry, pack the molds full of modeling clay. Press it tightly to avoid any gaps, but be careful, so you won't crush the mold. When the mold is full, use a craft knife to cut off any modeling clay that exceeds the top or bottom of the mold, and make sure the form of the heel is the way you want it.
Bake the heels in the oven according to the instructions given in the packaging of the modeling clay you're using. After getting them out of the oven, remove the cardboard immediately (as soon as you can handle the hot pieces). If you let the pieces cool down, the cardboard will be a lot harder to remove. If you're going to cover the heels with fabric, leather, etc., you can also leave the cardboard in place (especially, if you have used leftover pieces of clay of various colors and want to make sure that won't show through the material used for covering the heels).
Here are the finished heels for Miss Piggy.
The top of the heel may be convex even when you have cut it before baking. If that is the case, just use a craft knife to remove any extra material. This has the added benefit that glue will hold better, if the surface is cut or sanded after baking.
Tuesday, September 4, 2012
Copying a real-life design
Some months ago, I saw an interesting design at a shoe store. I took a photo as I knew I'd want to try making these in doll size.
The first version is for Monster High dolls. I'm thinking of trying them for a bigger doll as well, because of the potential for better details.
I started by making the patterns. The pattern for the upper looks so strange that I actually had to write in it which way the sides are supposed to go. Next, I made the cardboard insoles.
Usually, I make the closing mechanism last, but this time, the shape of the upper made it really hard to get it to stay in the correct position for gluing, so I had to get it closed before gluing. It's a simple bead and hole mechanism again. That's easy to make and works really well with leather.
With that problem solved, I manage to glue the uppers in place (after gluing pieces of leather on top of the cardboard insoles).
Then I glued the straps to the uppers. The straps are from a card-woven band I used for another pair previously. I really wanted to have more straps, like in the shoes I photographed at the store, but the band was too wide for that.
Then I glued the straps under the insoles.
Because the materials used were quite thick, I decided to fill the gaps with leftover pieces to ensure that the outer soles would be even.
For the toe parts, I glued oversized pieces and trimmed them after the glue was dry.
Then I glued the outer soles in place.
I made the heels from round strips of wood, which I glued in place and painted brown. You can also paint first and glue afterwards, but when you glue the heels in place first, you can hold the entire shoe when painting, paint the entire heels at once, and it is easy to put them to dry so that the heels won't touch anything.
Here are the finished shoes on Clawdeen.
The first version is for Monster High dolls. I'm thinking of trying them for a bigger doll as well, because of the potential for better details.
I started by making the patterns. The pattern for the upper looks so strange that I actually had to write in it which way the sides are supposed to go. Next, I made the cardboard insoles.
Usually, I make the closing mechanism last, but this time, the shape of the upper made it really hard to get it to stay in the correct position for gluing, so I had to get it closed before gluing. It's a simple bead and hole mechanism again. That's easy to make and works really well with leather.
With that problem solved, I manage to glue the uppers in place (after gluing pieces of leather on top of the cardboard insoles).
Then I glued the straps to the uppers. The straps are from a card-woven band I used for another pair previously. I really wanted to have more straps, like in the shoes I photographed at the store, but the band was too wide for that.
Then I glued the straps under the insoles.
Because the materials used were quite thick, I decided to fill the gaps with leftover pieces to ensure that the outer soles would be even.
For the toe parts, I glued oversized pieces and trimmed them after the glue was dry.
Then I glued the outer soles in place.
I made the heels from round strips of wood, which I glued in place and painted brown. You can also paint first and glue afterwards, but when you glue the heels in place first, you can hold the entire shoe when painting, paint the entire heels at once, and it is easy to put them to dry so that the heels won't touch anything.
Here are the finished shoes on Clawdeen.
Sunday, September 2, 2012
Transparent plastic
This was my first attempt of using transparent plastic for doll shoes. These are for Monster High dolls.
The plastic needs to be that soft and pliable, slightly stretchy variant. The piece I used was from a protective cover of a calendar, I think. The Create a Monster legs can be very handy for making shoes for the dolls, because they are easier to handle than the entire doll and more durable than plaster castings. The rows of pearls are sticker strips, which are easier to handle than separate stickers.
I started by making patterns for the required parts.
Then I made the insoles from two layers of cardboard and glued fabric on top.
This photo shows one finished insole and the other one waiting for some more gluing.
Cutting the upper pieces from plastic was a bit tricky as the patterns kept slipping from the plastic. I finally managed to cut all parts, but photographing them was the next challenge.
I didn't want totally transparent uppers, so I glued some pearls to the pieces.
Then I applied sealer to make sure the stickers won't fall off. Here are the pieces waiting for the sealer to dry.
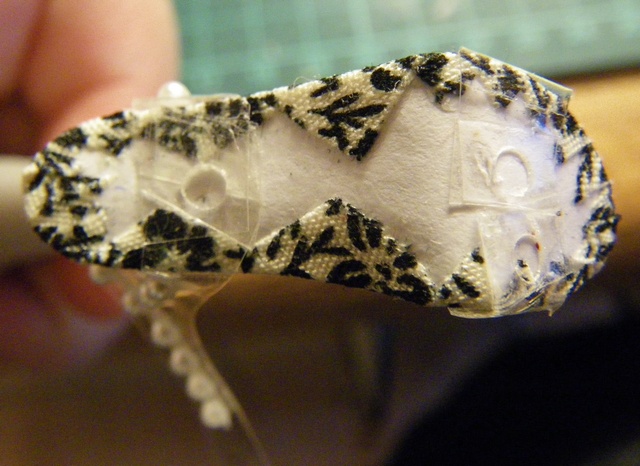
When the pieces were dry, I used some double-sided adhesive tape to attach the ankle strap bottoms to each other. Then I made a hole to the part where they overlap. The toe straps also got tape and holes for the reason explained below.
Although double-sided tape is quite good at keeping the plastic pieces in place temporarily while you haven't glued the outer sole in place yet, I didn't trust it to be a permanent solution. That is why I made the holes in the plastic pieces. The holes need to go through the plastic and any tape there might be, so that when you glue the outer sole in place, it and the cardboard sole will be glued directly to each other in the places where the holes are. These "plugs" will stop the plastic pieces from sliding anywhere, especially as the outer sole and cardboard sole will be glued to each other on both sides of the plastic pieces. So, the plastic is locked in the correct position and cannot move anywhere.
For closing the ankle strap, I attached a small bead to the other side and made a hole to the end of the strap going across the ankle. I used transparent thread for the bead and secured the knot with glue.
This is the construction after gluing the outer soles in place.
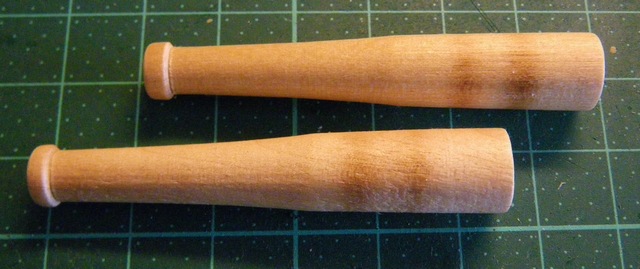
My uncle left a big stash of wooden cigarrette holders and I've been finding various uses for them. This time I decided to try using them for heels.
I sawed and cut them to a suitable shape and used cardboard to close all openings. Before gluing the top shut, I actually filled the heels with sand to help them keep their shape.
Then I glued the heels in place and painted them.
Here are the shoes on my custom Create a Monster doll "Bee."
The plastic needs to be that soft and pliable, slightly stretchy variant. The piece I used was from a protective cover of a calendar, I think. The Create a Monster legs can be very handy for making shoes for the dolls, because they are easier to handle than the entire doll and more durable than plaster castings. The rows of pearls are sticker strips, which are easier to handle than separate stickers.
I started by making patterns for the required parts.
Then I made the insoles from two layers of cardboard and glued fabric on top.
This photo shows one finished insole and the other one waiting for some more gluing.
Cutting the upper pieces from plastic was a bit tricky as the patterns kept slipping from the plastic. I finally managed to cut all parts, but photographing them was the next challenge.
I didn't want totally transparent uppers, so I glued some pearls to the pieces.
Then I applied sealer to make sure the stickers won't fall off. Here are the pieces waiting for the sealer to dry.
When the pieces were dry, I used some double-sided adhesive tape to attach the ankle strap bottoms to each other. Then I made a hole to the part where they overlap. The toe straps also got tape and holes for the reason explained below.
Although double-sided tape is quite good at keeping the plastic pieces in place temporarily while you haven't glued the outer sole in place yet, I didn't trust it to be a permanent solution. That is why I made the holes in the plastic pieces. The holes need to go through the plastic and any tape there might be, so that when you glue the outer sole in place, it and the cardboard sole will be glued directly to each other in the places where the holes are. These "plugs" will stop the plastic pieces from sliding anywhere, especially as the outer sole and cardboard sole will be glued to each other on both sides of the plastic pieces. So, the plastic is locked in the correct position and cannot move anywhere.
For closing the ankle strap, I attached a small bead to the other side and made a hole to the end of the strap going across the ankle. I used transparent thread for the bead and secured the knot with glue.
This is the construction after gluing the outer soles in place.
My uncle left a big stash of wooden cigarrette holders and I've been finding various uses for them. This time I decided to try using them for heels.
I sawed and cut them to a suitable shape and used cardboard to close all openings. Before gluing the top shut, I actually filled the heels with sand to help them keep their shape.
Then I glued the heels in place and painted them.
Here are the shoes on my custom Create a Monster doll "Bee."
Sunday, August 19, 2012
Shoes for 16" Miss Piggy
The basis for these shoes were plaster castings I had made some time ago. I glued the platform toe parts to cardboard soles that had 3 layers of cardboard glued in shape.
Next, I covered the sides of the toe parts with leather and filled gaps with leftover pieces to make sure that the outer soles would stay even when glued in place.
Then I covered the plaster casting heels with leather and glued them in place. Usually the heels are the last part to be glued, but I wanted to try a different method this time.
Then I covered with leather the edges that still had cardboard visible. The metal strip you can see in the photo is there to provide extra support to keep the arch in correct form. I don't use that a lot, but Piggy weighs more than smaller dolls, so some additional strength is a good idea.
For the closing mechanism I decided to try hook and eye, which turned out to be a bad idea as you can see later.
The straps are made of leather and the decorations are actually sticker strips with transparent background. Those are really easy to use for something like this. I covered the strips with glossy sealer just to be sure that nothing will fall off later.
The insoles are made of cardboard and covered with leather leaving some extra around the edges. I cut off the extra where the straps went, but in other places I turned it under the soles.
Here you can see the insoles with some sections already turned under.
The problem with hook and eye was that the end of the strap pointed to the side instead of going along the side of the foot. As I had already glued the pieces in place, I decided to fix this by cutting the hooks, pressing them flat and gluing the straps to the leather strips that held the hooks. So the result is no closing mechanism at all, but fortunately Miss Piggy's feet are different from most other dolls' feet and even shoes with fixed straps placed this high will be fine.
Subscribe to:
Posts (Atom)